Tuesday, 26 November 2013

Day 49 - Work Starts on the Indoor Lap Pool!

Jes' kidding.

With Digger Ryan and Doris's work complete. Well, at least for half of BarnGirl's Kitchen, Dining and Sitting Room, it was time to finish work on the Scooby Doo sandwich of layers - crushed concrete - check, thin layer of concrete lovingly hand-troweled by Boss Jon - check. Now is was time to see this Bituthene 8000 in action for the next layer. At £700 a roll, I wanted to at least touch the stuff and perhaps frame a sampler of it.

What is Bituthene 8000? For those of you who haven't been paying attention in previous posts, or just need a refresher, Bituthene 8000 is an advanced, self-adhesive water and vapour proof membrane for sub-structures. And, since my living space is kinda' underground, or at least one wall is essentially carved out of the sloping bank, I'll need every bit of waterproofing. 

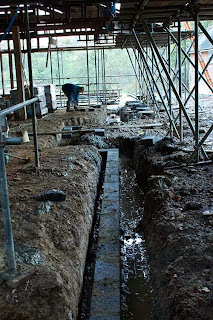
The lap pool

Smiley Tim and Shepherd Howard trying to sort a 90 degree angle. 'They said it would'


It comes in large rolls....from the USA, yes, at £700 per roll. Did I already mention that?! Hmm.  It's a couple of mil thick, flexible and apparently easy to bend and fold into sharp angles.

Bituthene 8000 is laid by peeling back the protective release paper and applying the adhesive face onto the prepared surface, free from ice, frost or condensation. Bit like one very large self-adhesive sticker.....fancy 
that!


Steel mesh with little plastic darleks aka 'plastic chair' to separate mesh


Steel mesh dividers
Two layers of steel mesh layers set in place, kept separate by the addition of 'plastic chairs'
Stack of 'chairs'


'Plastic chairs' keep layers of steel mesh separate    


Half of one side of the living space Bituthened and meshed


What on earth is this recess for? All will be revealed later.

Next, Mr Easycrete will be back and the whole Bituthened, steel meshed surface will be topped with concrete.

Bye for now.
Love
BarnGirl
xx


Meanwhile, on the Sunny South, the BarnBoys Pour Concrete in Trenches of South Elevation

BarnBoys South bound concrete delivery trail

With Luke and Ashley busy building BarnGirl's foundation walls upt' North, the BarnBoys were running around with hand mixed concrete, depositing each supply into the long trench down South.


First dump - Sitting Room end

Boss Jon receiving another load - Kitchen end

Smiley Tim plays with the concrete dumper

Boss Jon rakes and shakes
On hands and knees, praying for a dry eve

Smiley BarnBoys pushing their baby buggies of concrete. Despite low res, this is my fav shot of the day!


Next day - Concrete foundations have 'cured'
Concrete foundations level, set and ready for blockwork


Inspector Walt approves work in progress


As if by magic - Luke and Ash are back to add concrete blocks


In case you're wondering.....
The block work coming from the main line of concrete blocks will eventually be the resting place of the new beams, down posts (will find out the proper name), to replace the original beams, now in retirement, after over 100 year's service.


Next stop, the kitchen, dining room and sitting room floor. 
Love
BarnGirl
xx

Monday, 25 November 2013

Day 44, 45, 46, 47 and 48 - Luke and Ashley arrive to build BarnGirl's foundation walls

Good lord, stuff is finally coming out of the ground and going up, instead of coming down!  Bricklayer, Luke, with his wing man, Ashley, arrive on site to build the foundation walls, with the carefully 'blown dry' concrete blocks and bricks.

First, a couple of layers of concrete blocks, topped with bricks of various complementary shades, as per my brick swatch from earlier post.

Build away.......


Introducing Ashley (l) and Luke (r) as they make a start on the foundations


Sand, water, bricks and mixer - we're off.....
Bags o' sand


Bit like Bake a Cake's Kitchen Aid


East Elev. Positioning concrete blocks on concrete filled stepped trenches


Front foundations concrete blocks - from East to West
Front foundations concrete blocks - from West to East           


Luke adds the bricks on top of the concrete blocks using colour coded piles prepared by Ashley
Ashley gives the bricks a rub down and a brush up.  Actually, I believe it's called Pointing    


Bricks on the concrete blocks - Right of front door


For further detail on the fine art of bricklaying and pointing, see 'If you're interested' below.


Front - North elev, left of front door
Recess to front door starts to take shape. Well, almost!


Luke on the East Side
Corner of East and West


Corner of North and West
West side - Luke working on the wall either side of my 'fire escape'!

Meanwhille, the BarnBoys were busy preparing the trenches in the South elevation. Only this time Tim would be on concrete duty and Matt would be wheel barrowing single loads of concrete to fill the trench.  It was a long, tiring day.  More of this to follow.

Oh yay, I have walls!
Love
BarnGirl
xx

If you're interested....

TYPES OF BRICKS
There are literally thousands of different bricks, apparently they can be broken down into a handful of basic types. The vast majority are made from clay and are kiln-fired. There are SOLID, FROGGED, PERFORATED types; BarnGirl's are frogless.

Facing Bricks
Quality, durable bricks with an attractive appearance for external use above ground.

Wirecut
The clay is continuously extruded to a required size and shape and then cut into individual bricks by means of a wire, much like a cheese is cut by cheesewire. Thousands of variations in colour and texture. Usually the cheapest facings available as the manufacturing process is highly automated.

Stock
The clay is wetted to a so-called "soft mud" and then moulded to shape, before being allowed to dry prior to firing in the kiln. Much of the process is automated. Tend to be slightly irregular in shape. Usually a bit more expensive than wirecuts.


Handmade
Usually made on a bench, in a mould, much as described above for a stock brick. Because the clay isn't firmly compacted by machine, each brick normally has distinctive creasing known as a 'smile'. Very desirable, and the most expensive of the facings, but well worth it on prestige jobs.


Fletton
Also known as 'London Bricks'. A unique facing brick manufactured from the Lower Oxford clay found only in SE England. This clay contains coal traces, which burn during firing, reducing the amount of fuel needed for the kiln, which not only keeps down costs but also produces some interesting effects in the bricks themselves.


Commons
A cheap 'fill' brick, designed to be utilitarian rather than attractive. Having said that, some have a charm of their own and are perfectly fine for smaller jobs.


Engineering
The workhorses of the brick family. Tough, strong, hard-wearing but not usually very pretty. They have excellent resistance to frost and to water, making them ideal for groundworks, sewer works and retaining walls. You pay for the performance.


Concrete or Calcium Silicate
Popular in areas where good brick-making clay is scarce. Some are awful, but others may be split-faced or have a pitched face to give an impression of being something other than concrete. Cheap and cheerful sums them up.


Reclaimed
Salvaged bricks. Bricks rescued from old buildings and cleaned up, of a fashion. You really have to know what you're looking for to make sure you get decent quality rather than any old dross, so buy through a reputable merchant. Their charm is undeniable, when laid by a good brickie, but there can be a high level of wastage. Many will be the old Imperial sizes (2 5/8" or 3")which are incompatible with the modern metric bricks (65mm). Don't be fooled into thinking that because they have been rescued from some old house that they will be cheap - cleaning them up and sorting them is a labour intensive task and they can cost twice the price of a quality facing or a 'reproduction' reclaimed.


Specials
Any brick that isn't a rectangle. Just to confuse non-bricklayers, there are "standard specials", such as bullnoses, cants and radials, and "special specials" such as cills and quoins. These specials allow fantastic design possibilities and make brickwork the most aesthetically pleasing medium for building.


BRICKLAYING
Bricklaying is a skilled trade that takes years to master. Bricks are laid in courses, on a bed of mortar, with a taut string line used as a guide to line and level. The horizontal joint is the "bed joint"; the vertical joints are "perpends".

The ends of walls are built first, with the level and verticality of the bricks checked repeatedly as the corners/ends are raised. The gauging is also checked, to ensure that 4 courses measures 300mm. The ends are typically "Racked Back", which allows successive courses to be laid direct to the string line without having to continually check the work with a spirit level.

The bed mortar is laid out and shaped to accept the bricks. The end of the brick to be laid is buttered with mortar and then shoved against the preceding brick, squeezing the mortar to a width of 10mm. The brick is tapped down to level with the heel of the trowel, any surplus mortar extruded from the bed or the perpend is scraped off with the trowel, and then the process repeated with the next brick. At the completion of each course, the guide line is moved up to the next course.


Apparently, there are over 30 different brickwork bonds that can be used. 

With solid or perforated bricks, the orientation of the brick doesn't matter, but with frogged bricks, the frog should always be laid uppermost. This ensures that the loading of the wall is evenly spread across its width, rather than being concentrated onto the edges, and that there are no voids within the brickwork that could be weak spots.


Frogged or perforated brickwork should always be covered over if left unfinished for any period when rain is about, to prevent the frogs or perforations filling with water which would make a mess of the bed mortar when bricklaying resumes.


BarnGirl's frogless bricks were cozily wrapped in hessian, after seeing the forecast for yet more rain and single digit cold.


POINTING STYLES 
Pointing ensures the bed joints and perpends are properly filled with mortar. Pointing is usually undertaken an hour or so after the bricks have been laid, long enough for the mortar to stiffen but not so long that it has become unworkable. The unpointed joints can be topped up with fresh mortar if they are not quite full, before tooling to the required style.

The most common pointing styles are -  Weatherstuck, Recessed, Bucket Handle and Flush. The Weatherstruck and Flush profiles are formed with the blade of a trowel. The Bucket Handle profile is formed with a semi-circular section jointing bar, and the Recess profile is created with a joint raker.


Tooled joints, notably the Weatherstruck and Bucket Handle, offer better resistance to rain penetration.


Reference - Brickwork Basics


"My name is Jon and I like Diggers"

All was quiet on the northern front, but Inspector Walt and BarnGirl could hear a dig 'n purr on the other side of the building. No digger Ryan today, so who could it be?!

Hmm. What's this I see?  A shiny new digging bucket pick-up, clam thingy in the back of Boss Jon's trailer. 


Indeed, we have ANOTHER boys' toy on site - a brand new JCB 8018cts. Doris, the Digger.  The ultimate mini excavator. It boasts 'best-in-class performance, allied to incredible build quality, superlative strength and unbeatable ease of operation.' So say JCB.

First outing for Doris, the Digger

Boss Jon goes a-digging

'I hope that isn't a scratch!'

Doris rests after a hard first day


She
really is a clever little lady - nimble, neat, responsive, a good mover, full of bling, bells and whistles. And just because I know you really want one and you'd love to know more about Doris's shapely stats, please read 'If you're interested' below.

Loving some of the digger-speak:

'long dipper'

'Gravemaster dipper'

'Mechanical quickhitch' - a new term for speed dating perhaps?

'Dozer extensions swing out easily on this mini excavator, which allows operators to quickly and easily shift the dozer wings.

'The 8018 CTS uses the very latest sealing technology – O-ring face trapezoidal seal hydraulics minimise leaks.'

'To optimise durability and service life, we’ve fitted replaceable steel bushes to the kingpost, dipper nose and bucket-tipping link.'

'top-mounted boom ram'


We hope Doris felt at home after her first day in the mud n clay and Boss Jon's happy, having fed his gadget habit.

Love
BarnGirl
xx


If you're interested....
 

Maximum Dig Depth 3.075

Maximum Dump Height 2.846
Machine options

  • 1261mm (4ft-2in) long dipper
  • Gravemaster dipper*
  • Dipper pipework
  • Hand held tool circuit,
  • Variable displacement pump
  • Biodegradeable hydraulic oil
  • ROPS & TOPS certified fully glazed cab (includes heater, interior light, door holdback latch with internal/external release, gas strut assisted front screen)
  • FOPS roof guard
  • Dual pattern controls (ISO/SAE change-over)
  • Track pedals
  • Mounted worklights
  • Engine fan guard kit
  • Mechanical quickhitch
  • Rotating or strobe beacon
  • Toolkit and greasegun
  • Heavy duty track tension
  • JCB impact protection front screen
  • 9 digging buckets (160mm to 760mm)
  • 2 ditching/grading buckets (900mm & 1000mm)
  • Hydraulic breakers
  • Earthdrills
  • Hydraulic kerb-lifter
  • Mirror
  • Suspension seat
  • Radio
  • Fire extinguisher
  • Sunblind (cab builds)
  • Battery isolator
  • Travel alarm
  • Immobiliser
For full details check out this link for the JCB 8018cts

Tuesday, 19 November 2013

There's a Digger in my Sitting Room!

and lo....it was true! Inspector Walt and BarnGirl wandered up to the South elevation of the barn, to find a digger in da house!

Digger Ryan was back and digging up my sitting room, dining room and kitchen.  In case you're wondering why only half the floor has been gobbled up and removed, this is step one of two, which includes preparation and creation of the retaining wall, as per the deets drafted in an earlier post, when us Barn Folk realised the whole wall had to come down.

Step One - A layer of crushed concrete, followed by a couple of mils of concrete leveled by hand with a trowel, followed by our friend, Bituthene 8000 tanking, followed by steel mesh, and more concrete to fill the space to a required level and continue up the wall....the retaining wall. More of this as it progresses.

Step Two - Scaffolding posts will be moved further out, Digger Ryan will return to dig up the remaining side of the floor and most of the steps above will be repeated.

Digger Ryan Returns

Scooping out the sitting room floor


'Yep, BarnGirl, it's definitely a digger and it's heading for your fire place'
Boys' Toys in my Sitting Room

Kitchen


Love 
BarnGirl
xx