Well, we DID have a problem. But, when you have an architect and a builder who don't like to present a problem without first offering a few solutions, I'd say that the little matter of a large retaining wall has been resolved.


A week or so ago, I was in the dentist chair, with a face full of tools, when I heard my handbag ringing an ios7 iAppley tune. Eventually, when I was in a position to listen to the message and return the call, albeit pillow-lipped, Phil, my architect's right-hand man, explained that there was an unforeseen problem with the retaining wall, between the upper and lower level.
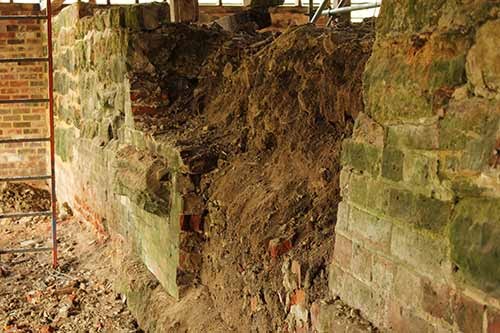
It was assumed that the existing wall was approximately 9 inches thick. (They sometimes talk in inches, honest). The original plan was to shave, sorry, 'scabble' back to level the wall, in order to make room for the various layers - crushed concrete, Bituthene 8000, reinforced concrete, insulation board, plasterboard etc - without encroaching too far into the room. Fortunately, before they started 'scabbling', Boss Jon had the presence of mind to drill a few small holes along the wall. In one area, they cut away a sizeable chunk to get a good look.
Please read 'If you're interested. Two' if you want the precise details of what was to take place and a version of what will take place, bearing in mind the changes highlighted in Option 3. You may need a foreign language dictionary, but it's really worth a glance. The level of detail in this one small paragraph is replicated for every single detail of the build. Amazing!

This is when the extent of the problem was unearthed, literally. The majority of the wall was only half a brick thick and no where near 9 inches, typical of old farm buildings. If these areas were broken off, I was advised that we would have lost the lower brickwork completely and therefore the existing wall would have become unstable and would probably have collapsed into the lower barn. Hmmm. 'Right hand' Phil's suggestion was to leave the wall as it was and to build-up the layers, as previously planned, in front of it. As detailed below in 'If you're interested. Two'.
 |
| Hole in the wall reveals all |
 |
| Ooops. Can't see 9 inches here. |
I sputtered acknowledgement and said I would drive straight over to the barn, to see for myself and discuss with Boss Jon. I missed most of the miles from dentist to barn, deep in thought, a tad concerned about how much more room I'd lose. In the grand scheme, not a major drama, but once corrected, it couldn't be easily changed.
It was clear that any option was going to incur more cost. Ugh. So, to cut to the chase, I really didn't want to lose another 'foot' into the room, (300mm for those of us living in a partially metric world. I still prefer to bake in ounces!). I was presented with 3 options and went for numero 3*:
With the decision made, work commenced and the wall came a-tumbling down!

Matt's back from the sunshine and since he missed out on the removal of the foundations at the front, he's now chief wall-taker-downer.
I'd better get off the wall and crack on with the rest of the updates.
Love
BarnGirl
xx
*If you're interested....
the deets behind my options
Option 1
Move the already detailed concrete retaining wall into the kitchen and living area so that the projecting sections of the wall would not need to be cut off. The disadvantage of this option is that there is a significant loss in floor space in the lower section of the barn. Also there will be a need for a considerable increase in the amount of concrete to construct the wall as the void behind the back of the wall and existing wall would need to be filled with concrete.
Option 2
Now that the existing timber frame is supported on the scaffold, would be to remove the existing retaining wall which will involve excavating to the back of the retaining wall to provide working space so that a new retaining wall can be constructed. In option 2 a new retaining wall will be constructed of concrete as originally specified. The positive result of doing this would be an increase in floor space in the lower section of the barn but the downside is the additional cost of removing the existing retaining wall and then making good the excavation and the additional form work that will be required for the concrete wall as this now will need to be placed on both sides of the wall rather than one side if it was being cast against the existing retaining wall.
Option 3
Very similar to option 2 but in order to try and reduce cost, the retaining wall will be constructed out of two skins of block work with a reinforced concrete central cavity. We hope that savings would be achieved in the ease of construction and cost of materials when compared with option 2. .....
If you're interested Two.....
Original building spec for retaining wall between upper and lower floor levels
Existing stone wall between upper and lower floor levels to be scabbled back to level wall. Installed 18mm think multi-coat render over face of wall. Installed Grace Products 'Bituthene 8000' tanking membrane over primed face of render.
....Are you still with me?
Tanking membrane to be sealed to Preprufe membrane below ground floor slab and sealed with Grace Products 'LM' membrane. Installed reinforced concrete retaining wall over face of tanking membrane, all in accordance with Structural Engineers details. Install 12.5mm thick British Gypsum 'Wallboard Duplex' plasterboard over 25mm x 47mm treated s/w vertical battens installed at 600mm c/c, with 25mm x 47mm treated s/w head and sole battens and intermediate battens. All plasterboard joints to be taped and filled and plasterboard to receive skimmed finish, over 65mm thick Celotex FR5065 insulation board.
...still there?!
At step in retaining wall where new concrete retaining wall stops and changes to stone wall, install 12.5mm thick British Gypsum 'Wallboard Duplex' plasterboard over 25mm x 47mm treated s/w vertical battens installed at 600mm c/c, with 25mm x 47mm treated s/w head and sole battens and intermediate battens. All plasterboard joints to be taped and filled and plasterboard to receive skimmed finish, over 65mm thick Celotex FR5056 insulation board, all installed over tanked render, allow for sealing fixings where penetrating tank membrane, all in accordance with manufacturer's details.
In the words of those irksome meerkats, 'Simples'!
 |
| Bituthene 8000 |
 |
| Celotex insulation board |
 |
| British Gypsum 'Wallboard Duplex' plasterboard |
I
No comments:
Post a Comment